An installed ACO Drain System should incorporate the following:
|
Correct grate type |
|
Correct channel type and size |
|
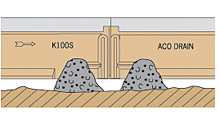
Minimum grade 25MPa compressive strength cement concrete surround |
Channel units are installed in a continuous trench run, and
are fully encased with concrete. |
|
1. Excavation
Excavation must be provided that allows a minimum of 100mm (Load Class A) of concrete on all sides of the ACO Drain
system. Specific loading and ground conditions will
increase the excavation size.
See installation files for specific product guidelines.
The excavation should be graded to follow the trench invert. Remove all loose material prior to pouring
concrete.
2. Layout and outlet installation
For sloped trench systems, polymer concrete in-line pit drill-outs are compatible with most channel depths.
i |
Determine type of outlet required and its position |
ii |
Install the outlet unit and set haunch |
iii |
Leave any outlet drill-outs until channel is aligned correctly and concreted to desired height |
vi |
Start installation from the outlet unit, proceeding along the run from the deepest (highest channel no.) to the shallowest (lowest channel no.) unit. |
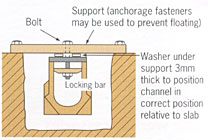
3. Trench drain installation
Channel units need to be supported at correct height and held securely in place to avoid movement during concrete
pour. There are a number of options available to support channel units; refer to site installation manual.
For new construction, use patty supports.
For retrofit, use either patty supports or the hanging method.
 |
 |
Patty supports
Care should be taken that concrete is not trapped in the joint between the channels. |
Hanging method
A nut & bolt can be used to suspend the channel from timber supports. |
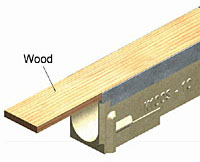
4. Locating gratings
To prevent the channel wall and joints being distorted by the pressure of concrete, grates (or plywood of equivalent width) should be installed in the channel. The grates should be suitably wrapped to protect from concrete splash. Shims or washers placed along each side allow easy removal of the grating. |
  |
5. Finishing installation
To finish installation, pour concrete evenly either side of trench. The top of the adjacent pavement must be above the grating level by approximately 3mm. Brick pavers should be set slightly above the trench edge. First brick course should be set on mortar/concrete so that it is integral with the haunch. Care should be taken with asphalt rolling machines to avoid damage to trench edge. |
|
6. Completing trench installation
i |
Remove all grates and remove plastic covering or masking tape. |
ii |
Remove debris from trench drain and make sure outlet pipes are clear. |
iii |
Install rubbish basket in pits, if required. |
iv |
Replace grates and secure. |
v |
Flush trench run to check for pipe work blockages. |
The trench drain is now ready for use. |